Using the ballistic calculator
The Calculator page turns your rifle, load and conditions into a trajectory and a printable range card. This guide walks through every input and then explains how to read the results.
The workflow
Open Calculator and work top to bottom. The trajectory preview and summary card on the right update automatically as you type — there is no “calculate” button.
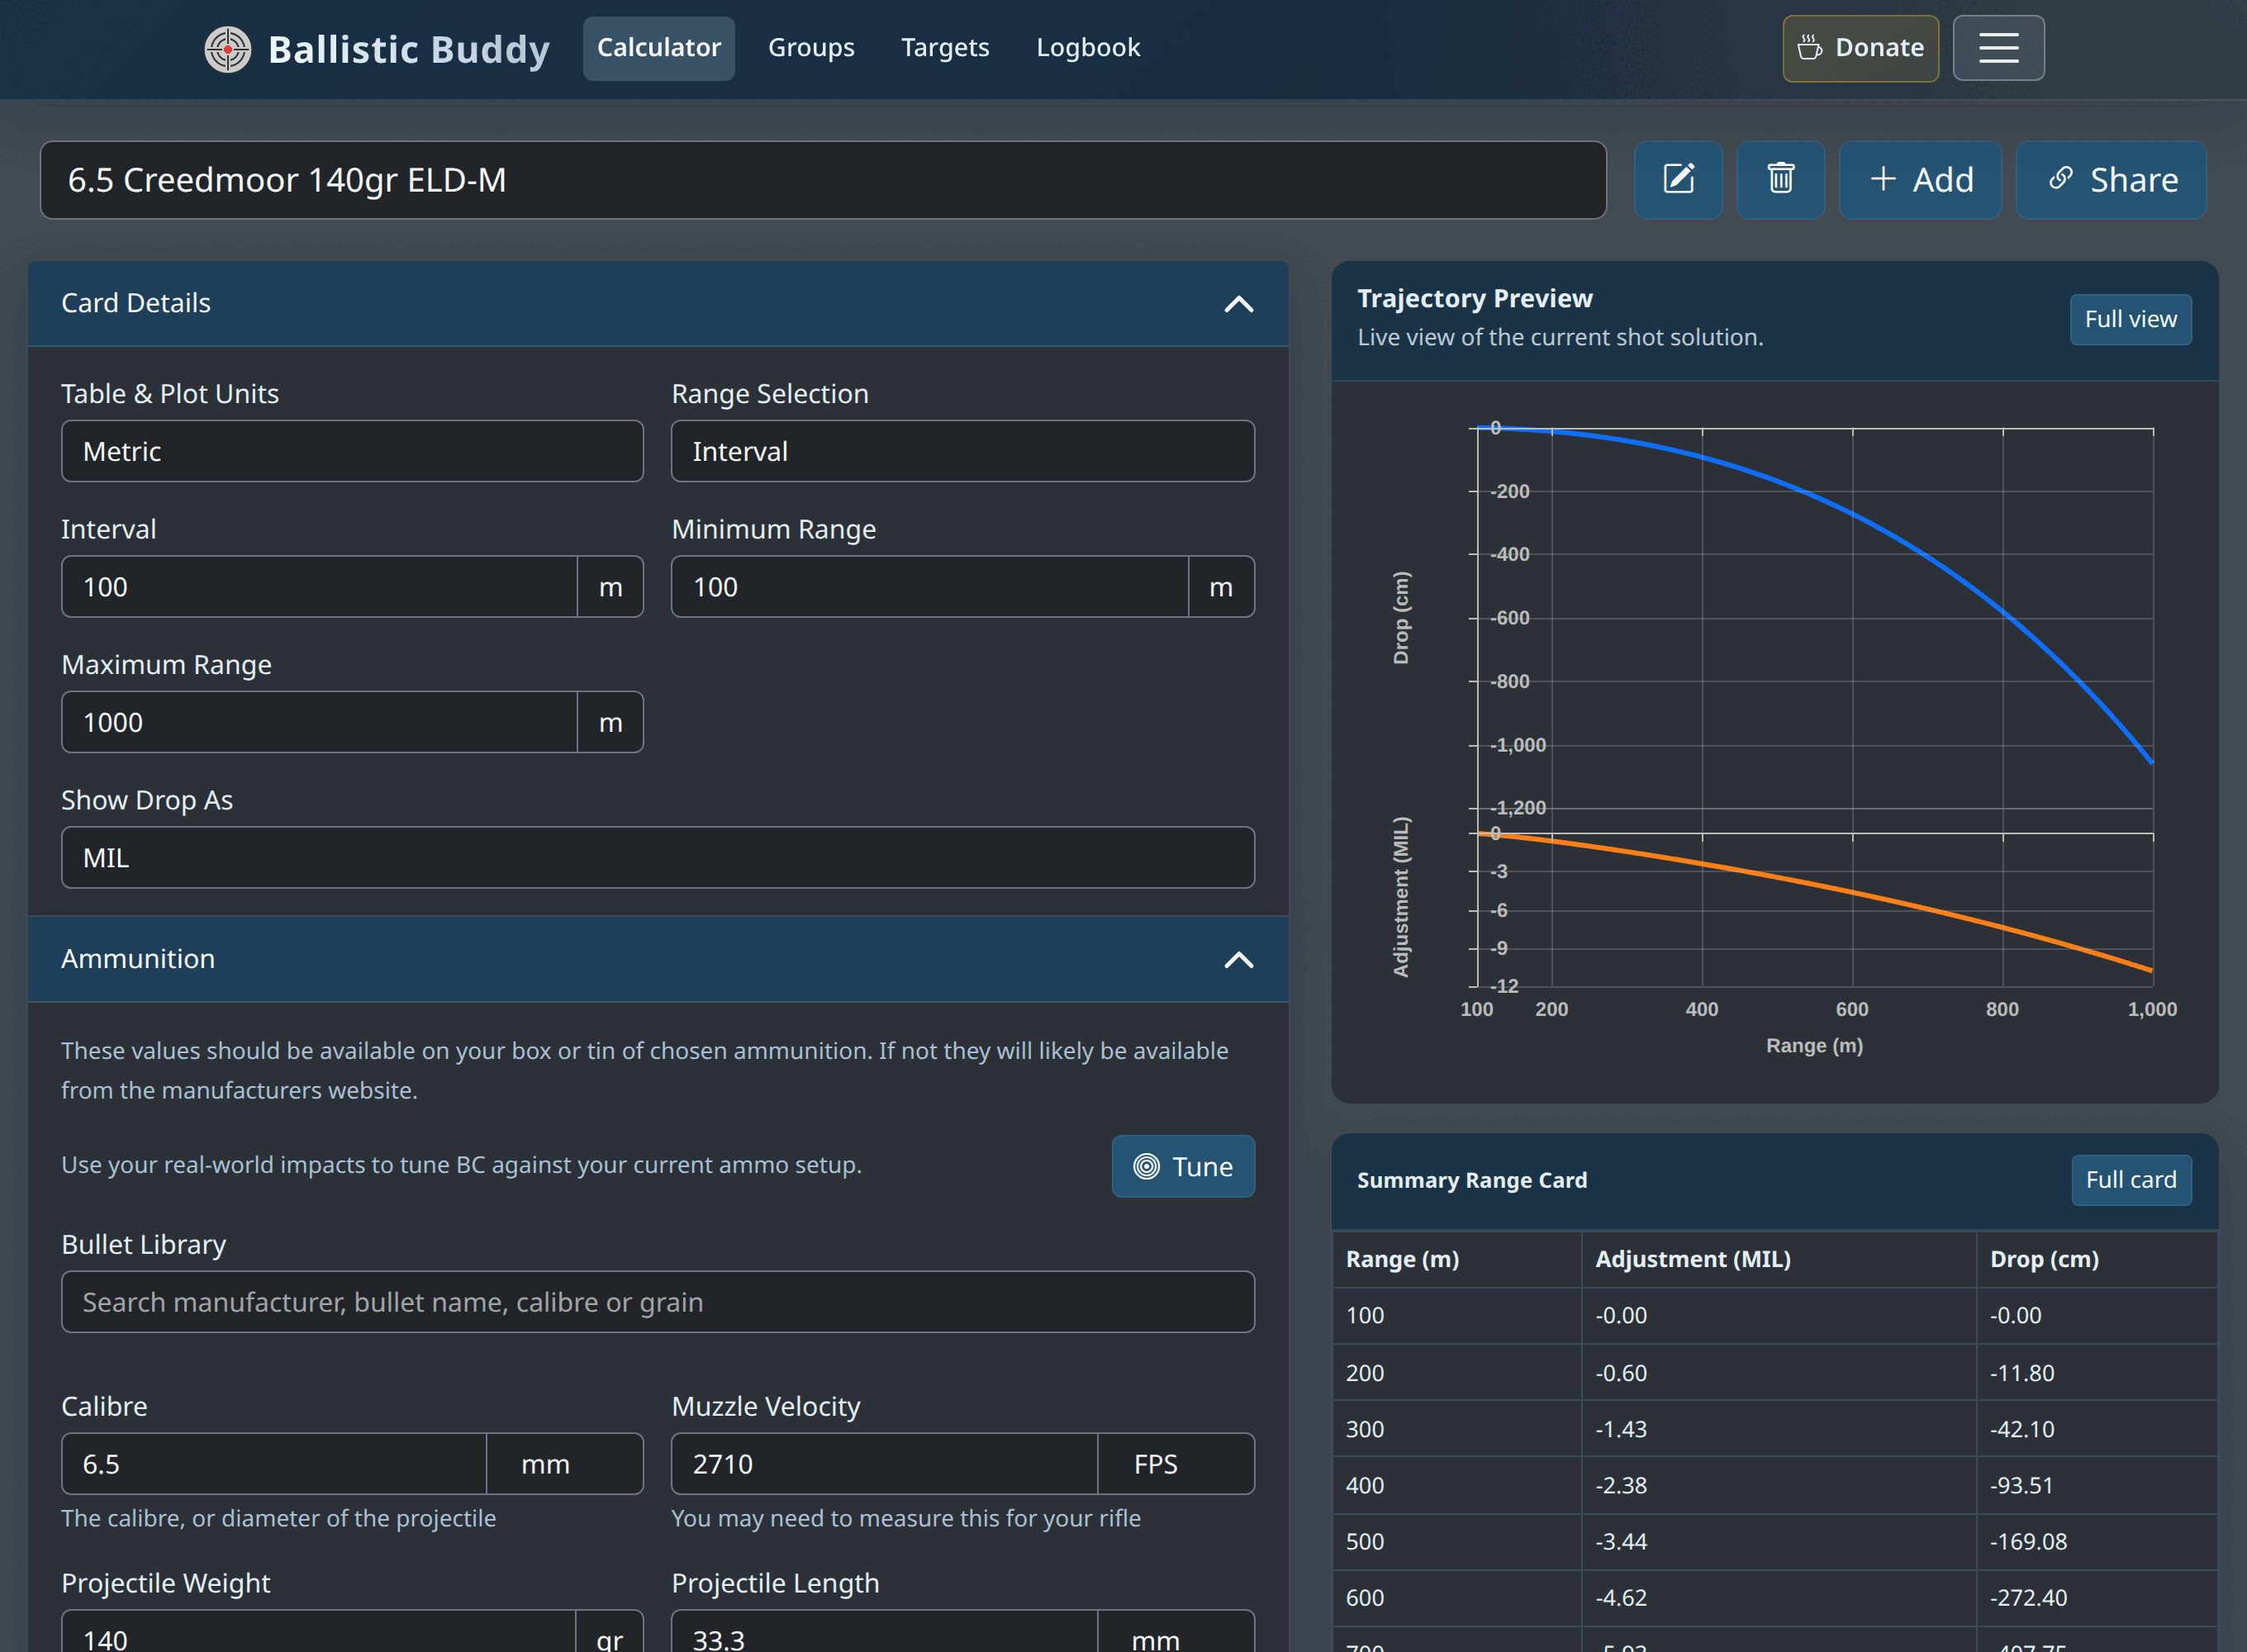
- Card Details — units, and which distances the card should cover.
- Ammunition — the bullet and how fast it leaves the barrel.
- Firearm — your zero, sight height and barrel twist.
- Environment — air conditions (optional; sensible defaults are used).
Card Details
| Table & Plot Units | Metric (m, cm) or Imperial (yards, inches). This controls the distance and drop units shown in the outputs. |
|---|---|
| Range Selection | Interval generates rows from a minimum to a maximum range at a fixed step. List lets you type the exact distances you want (for example 100, 200, 300, 450, 600). |
| Interval / Minimum / Maximum Range | Used in Interval mode. Keep the maximum realistic for your load — solutions past the transonic zone become unreliable. |
| Show Drop As | MIL or MOA — match this to the turrets or reticle on your optic. See MIL vs MOA below. |
Ammunition
These numbers come from the ammunition box or tin, or the bullet manufacturer’s website. Start typing in the Bullet Library search to pull calibre, weight, length and BC straight from a known projectile.
| Calibre | Bullet diameter (not the cartridge name). A 6.5 mm bullet is 6.5 mm / 0.264 in; .308 is 7.82 mm / 0.308 in. |
|---|---|
| Muzzle Velocity | How fast the bullet leaves your barrel. Factory box figures are measured in a test barrel and are often optimistic — a chronograph reading from your rifle is far better. |
| Projectile Weight | Grains or grams, as printed on the box. |
| Projectile Length | Optional. Combined with barrel twist it lets the app estimate gyroscopic stability and spin drift. |
| Ballistic Coefficient | A measure of how well the bullet holds velocity. Must be paired with the correct drag model. |
| Drag Table | The reference drag curve the BC is quoted against. G1 is standard for flat-based and lighter bullets; G7 fits modern boat-tail match bullets far better. Use whichever the manufacturer publishes — a G7 BC entered as G1 (or vice versa) will be badly wrong. |
Not sure your BC is right? Once you have real impacts at distance, the BC / velocity truing wizard can correct it to match your rifle.
Firearm
| Zero Distance | The range at which your point of aim and point of impact match. Every drop figure on the card is measured relative to this. |
|---|---|
| Sight Height | Centre of the scope tube to centre of the bore. Matters most at close range; 3.8–5 cm (1.5–2 in) is typical for a bolt gun. |
| Barrel Twist | Turns per inch (e.g. 8 means 1 turn in 8 in). Used with projectile length for stability and spin-drift estimates. A positive value is a right-hand twist. |
| Shooting Angle | Uphill or downhill angle to the target in degrees. Leave at 0 for flat ground. |
Environment
Altitude, temperature, pressure and humidity describe the air the bullet flies through. They default to the ICAO standard atmosphere, and only change the solution meaningfully at longer range. If you are shooting past ~600 m, enter the conditions on the day — a hot day at altitude can move your 800 m dope by several tenths of a mil.
Reading the trajectory chart
The Trajectory Relative to Zero chart shows how far the bullet is above or below your line of sight at every distance. It crosses zero at (or near) your zero range, then curves away downward as gravity and drag take over.
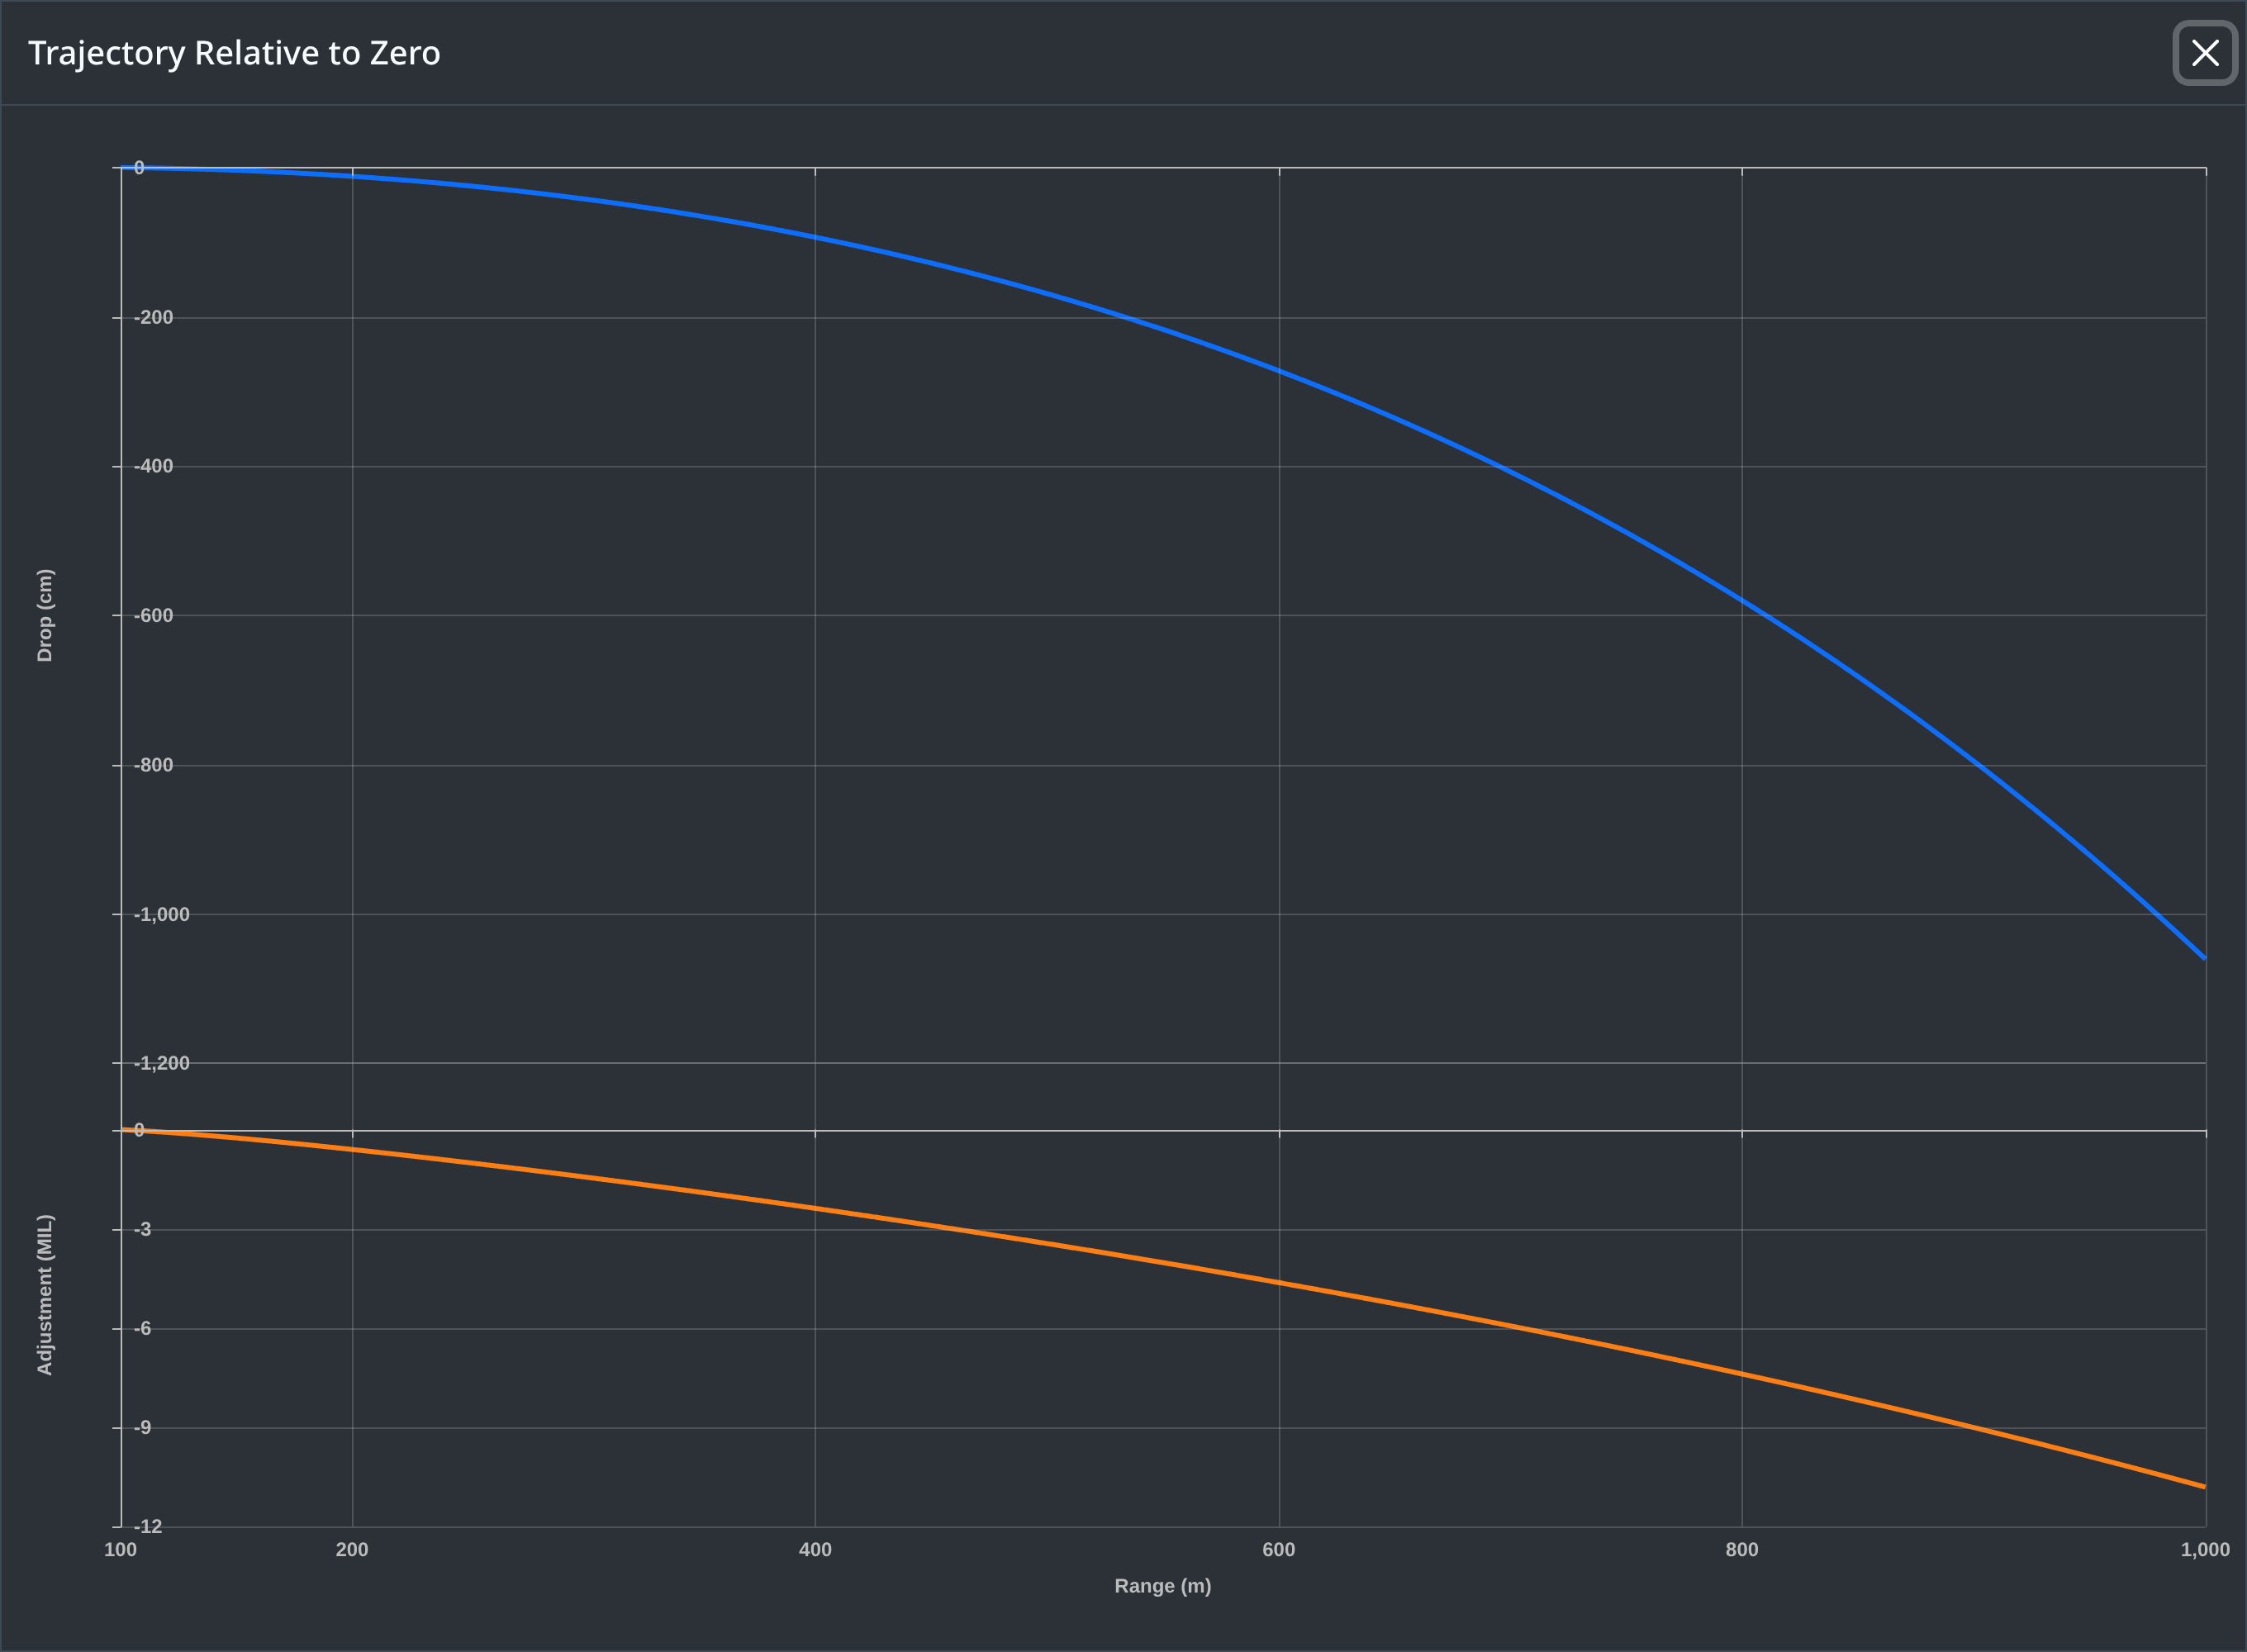
- Both axes are negative below the zero because the bullet is beneath your line of sight. The number is how much elevation you dial up (or how high you hold) to hit at that distance.
- The curve steepens with distance. The gap between, say, 800 and 900 m is much larger than between 100 and 200 m — small range-estimation errors cost more the further out you shoot.
Reading the range card
Click the fullscreen icon on the summary card to open the complete table. This is the card you print and tape to your stock.
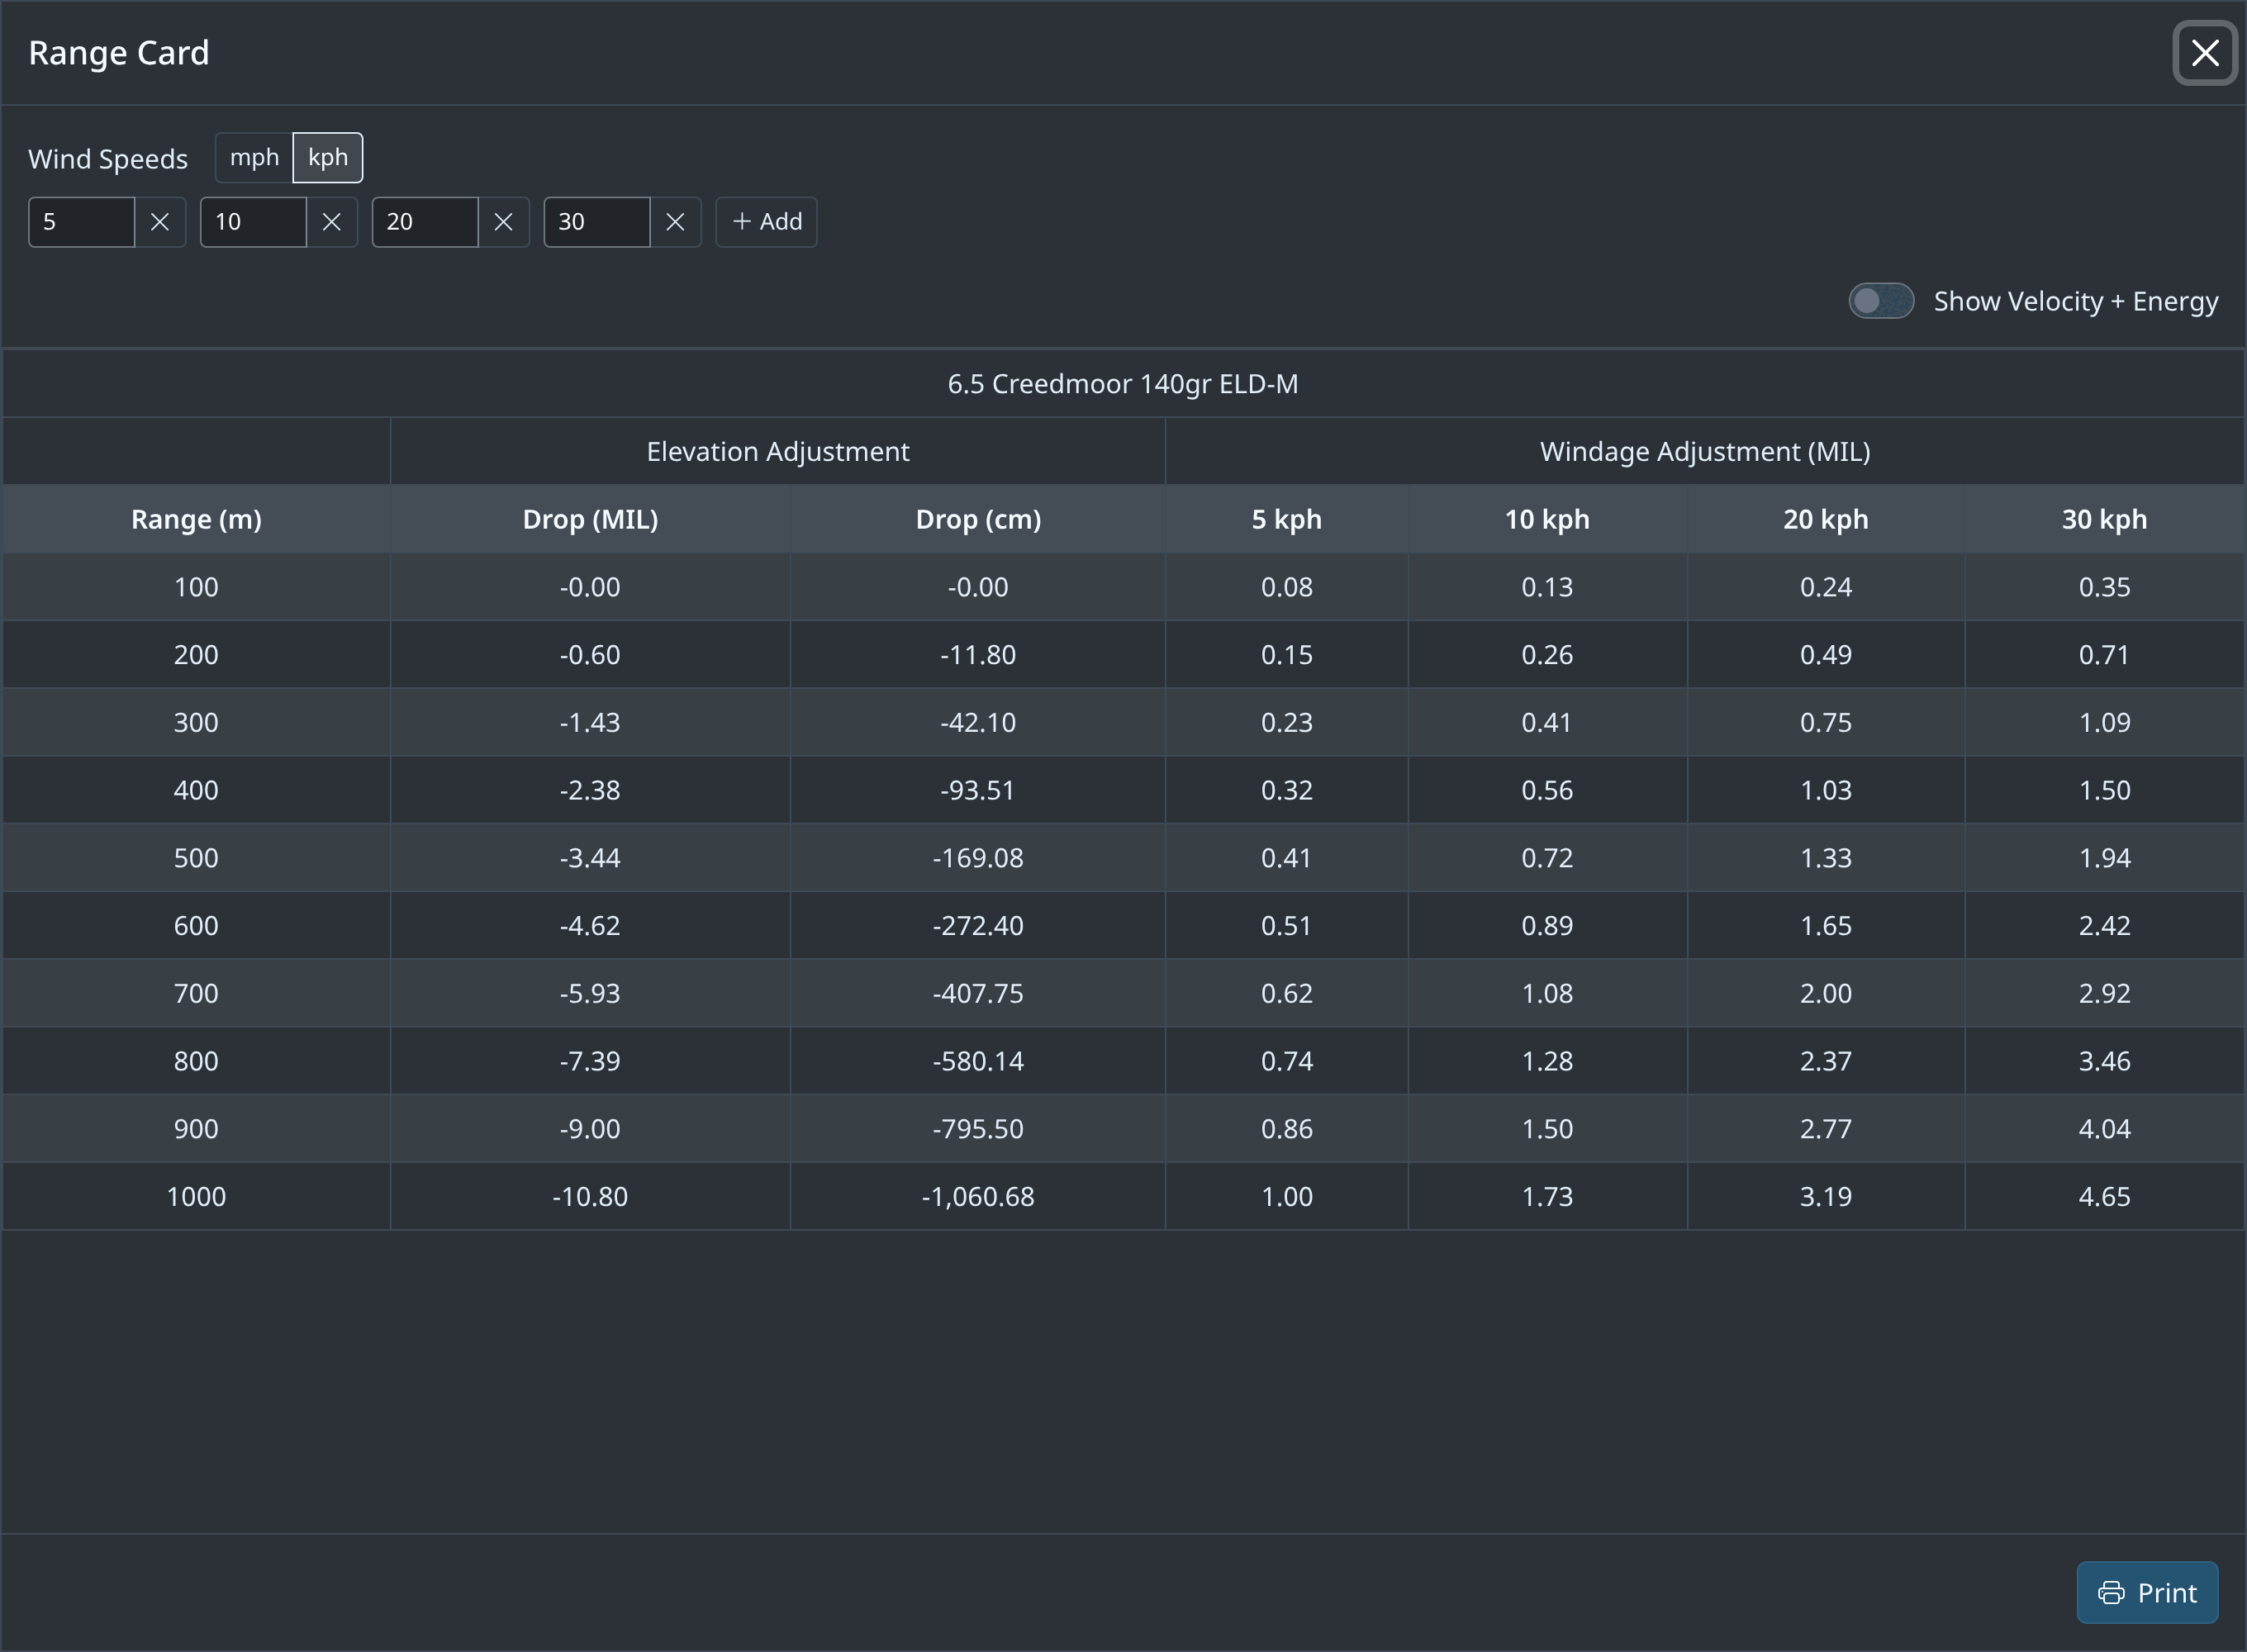
| Range | The distance for that row. |
|---|---|
| Elevation Adjustment (MIL / MOA) | What to dial or hold for elevation. Negative means the bullet is below your zero at that range, i.e. dial that much up. |
| Drop (cm / in) | The same drop as a linear distance, useful for holdovers against a known target size. |
| Windage Adjustment columns | One column per wind speed you add. Each value is the hold for a full-value (90°) crosswind at that speed. For a wind quartering at 45°, use roughly half. Switch wind units and add or remove speeds with the controls above the table. |
| Velocity + Energy | Toggle on to add remaining velocity and energy columns — handy for checking you are still supersonic, or meeting a minimum energy for hunting. |
MIL vs MOA
Both are angular units — they describe an angle, so the linear distance they represent grows with range. Pick the one your scope uses and stick with it.
| 1 MIL (milliradian) | 10 cm at 100 m · 3.6 in at 100 yd. Most tactical turrets are 0.1 mil per click. |
|---|---|
| 1 MOA (minute of angle) | 2.91 cm at 100 m · 1.047 in at 100 yd. Turrets are usually 1/4 MOA per click. |
| Conversion | 1 mil = 3.44 MOA. |
Saving, sharing and printing
- Add names and saves the current card. Saved cards live in your browser and appear in the dropdown at the top.
- Share produces a link that encodes the whole card — open it on another device or send it to a mate and they get the exact same setup.
- Print (from the full card view) is laid out for paper; print it, laminate it, and you have field dope that works with a dead battery.
On the range, Solve turns the card into the dial for one shot — any range, the angle, and the wind at its real direction rather than the card’s full-value crosswind. See Solving a single shot .